

Table of Contents
- Why Organizing Your Manuscript Matters Before You Revise
- Step 1: Break Your Manuscript Into Scenes and Chapters
- Step 2: Set Up a File Naming System and Version Control
- Step 3: Use Novel Organizing Software to Map Your Structure
- Step 4: How to Fix Plot Holes in a First Draft
- Step 5: Apply a Novel Manuscript Structure Template
- Step 6: Create Your Editing Plan and Manage Word Count
- Common Mistakes to Avoid When Organizing Your Draft
- Frequently Asked Questions
Last Updated: August 31, 2026
Why Organizing Your Manuscript Matters Before You Revise
A messy first draft isn't a failure, it's raw material. But before you revise or publish, you need to see your story's shape. When your draft is scattered across files with scenes out of order and plot threads dangling, revision becomes a guessing game. You'll spend weeks polishing scenes that might not belong.
At writeinspire, we've worked with writers who hit this wall. The ones who moved forward fastest weren't the most talented, they were the ones who organized first. They broke their draft into scenes, mapped their narrative arc, spotted plot holes, and built a clear revision plan. That clarity changed everything.

This guide walks you through how to organize a messy manuscript so you can see your story's true structure, identify what's working, and build a revision plan that actually works.
Step 1: Break Your Manuscript Into Scenes and Chapters
Stop thinking of your draft as one giant block of text. Break it into scenes.
A scene is a unit of action where something happens, a conversation takes place, or a character makes a decision. Most scenes run 500 to 2,000 words. Each scene has a clear beginning and ending, and moves the story forward.
Go through your draft and identify where these natural breaks occur. You're looking for moments where the setting changes, time jumps, or focus shifts to a different character or conflict. Mark these breaks clearly with a line break, comment, or visual marker.

Identifying natural scene breaks in your first draft
Read through your draft in large chunks without editing. Your job is observation, not improvement.
Ask yourself: where does the action naturally pause? Where would a reader take a breath? Mark these moments consistently, a line break, [SCENE BREAK], or [Scene 1: The Argument] works fine.
Once you've broken your draft into scenes, count them. If you've written 50,000 words with 30 scenes, that's roughly 1,600 words per scene. This baseline helps you understand pacing and structure.
Creating a scene summary for each section
For each scene, write a one-sentence summary. This isn't detailed, just a quick note about what happens.
Examples:
- "Sarah confronts her mother about the inheritance"
- "The detective finds evidence at the crime scene"
- "Marcus realizes his business partner has been lying to him"
Write these summaries in a separate document, numbered to match your scenes. When you look at all summaries in sequence, you'll immediately see gaps, redundancy, and pacing problems. You'll spot scenes that are out of order or don't connect to surrounding action.
This is where you'll see your narrative arc. The summaries show your story's skeleton.
Step 2: Set Up a File Naming System and Version Control
A clear file naming system prevents chaos and makes it easier to track progress and revert to earlier versions if needed.
Naming conventions that track your drafting progress
Use a system with three pieces of information: project name, draft stage, and date.
Format: ProjectName_DraftStage_YYYY-MM-DD
Examples:
TheGhost_FirstDraft_2026-08-15TheGhost_FirstDraft_Revised_2026-08-22TheGhost_SecondDraft_2026-09-10
This tells you at a glance what version you're looking at and when you created it. As you move through revision, your naming might progress like this:
-
TheGhost_FirstDraft_2026-08-15(initial draft) -
TheGhost_FirstDraft_Organized_2026-08-25(after breaking into scenes) -
TheGhost_FirstDraft_PlotRevision_2026-09-05(after fixing plot holes) -
TheGhost_SecondDraft_2026-09-15(after major structural changes) -
TheGhost_SecondDraft_Edited_2026-10-01(after line editing)
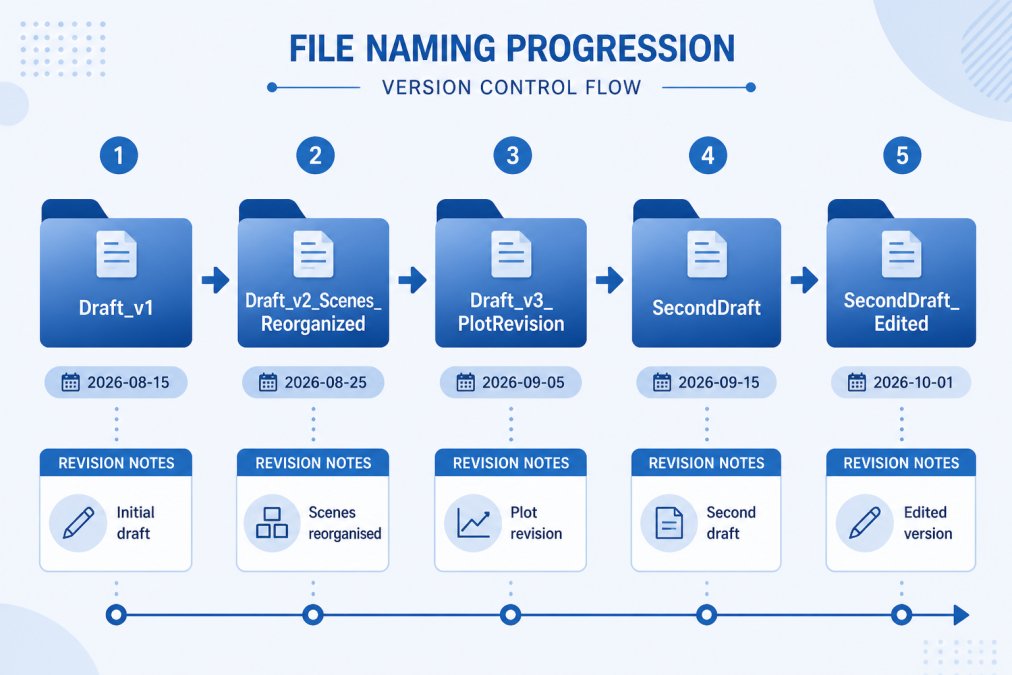
Version control for writers: keeping previous iterations safe
Every time you make a significant change, save it as a new file with an updated name. Don't overwrite the previous version.
Keep all versions in a single folder. Why? Because sometimes you'll cut a scene or restructure a section, only to realize weeks later that the old version was better. With version control, you can recover that material without starting over.
This practice also creates a record of your writing process. If you're working with a coach or editor from writeinspire's Writing Coaching and Guided Resources, they can review specific versions and give feedback on how your revisions are progressing.
Step 3: Use Novel Organizing Software to Map Your Structure
Once you've broken your manuscript into scenes and created summaries, you have options for visualizing this information.

A spreadsheet (Google Sheets or Excel) is simple and flexible. Create columns for: Scene Number, Scene Title, Summary, Word Count, POV Character, Location, and Notes. Each row is one scene. You can sort by any column, filter by character or location, and instantly see your manuscript's structure.
Specialized manuscript software like Scrivener, Atticus, or Campfire Write offers more sophisticated features: scene cards you can rearrange visually, character tracking, timeline views, and built-in revision tools.
What matters is that you have a visual overview of your manuscript's structure. You need to see all your scenes at once, understand how they connect, and identify where the narrative breaks down.
Step 4: How to Fix Plot Holes in a First Draft
Plot holes are gaps in narrative logic, moments where something doesn't make sense, a character's motivation is unclear, or the cause-and-effect chain breaks. Every first draft has them.
Visual mapping techniques to spot narrative gaps
Print out your scene summaries or open them where you can see them all at once. Read through them in sequence, looking for these common problems:
Missing motivation: A character makes a decision without shown reason. They agree to help, but there's no scene establishing that they care about the outcome.
Unexplained changes: A character's behaviour shifts between scenes without a scene showing that shift. They're cautious in Scene 5, confident in Scene 7, with nothing in between to explain it.
Timing problems: Events happen in an order that doesn't make logical sense. A character reacts to information before they could have learned it.
Unresolved threads: A subplot starts but never resolves. A mystery is introduced but never explained.
As you read through your summaries, note these gaps. Mark them clearly. Don't try to fix them yet, just identify them.
Creating a plot-hole checklist for revision
Create a checklist of every plot hole you've identified. For each one, write:
- What the problem is
- Where it occurs (which scenes)
- What needs to change to fix it
Example:
- Problem: Sarah doesn't explain why she's suddenly willing to forgive her mother
- Location: Scene 12 (the reconciliation)
- Fix needed: Add a scene earlier (between Scene 10 and 11) where Sarah realizes her mother was trying to protect her
This checklist becomes your revision roadmap.
Step 5: Apply a Novel Manuscript Structure Template
Most stories follow recognizable patterns. Understanding these patterns helps you see whether your manuscript is structured effectively.
The three-act structure is most common: Setup (Act 1), Confrontation (Act 2), and Resolution (Act 3). Within each act are key turning points where the story shifts direction or stakes change.
A typical breakdown for an 80,000-word novel:
- Act 1 (Setup): 15,000-20,000 words. Introduce the protagonist, world, and central conflict.
- Act 2 (Confrontation): 40,000-50,000 words. Escalate conflict, introduce complications, move toward crisis.
- Act 3 (Resolution): 15,000-20,000 words. Resolve the central conflict and show consequences.
Within each act are smaller turning points. At the end of Act 1, something forces the protagonist into the main conflict. Midway through Act 2, stakes increase or the protagonist's approach fails. Near the end of Act 2, everything falls apart. In Act 3, the protagonist solves the problem or accepts the consequences.
Organizing from big to small: narrative arc first, details second
Map your scene summaries onto this structure. Which scenes belong in Act 1? Act 2? Act 3?
Look at your word counts. Does Act 1 feel too long or too short? Are you spending too much time on setup and not enough on confrontation? Is Act 3 rushed?
Think at this level during organization, not individual sentences, but the overall shape of your narrative. Does your story have a clear beginning, middle, and end? Do the acts feel balanced?
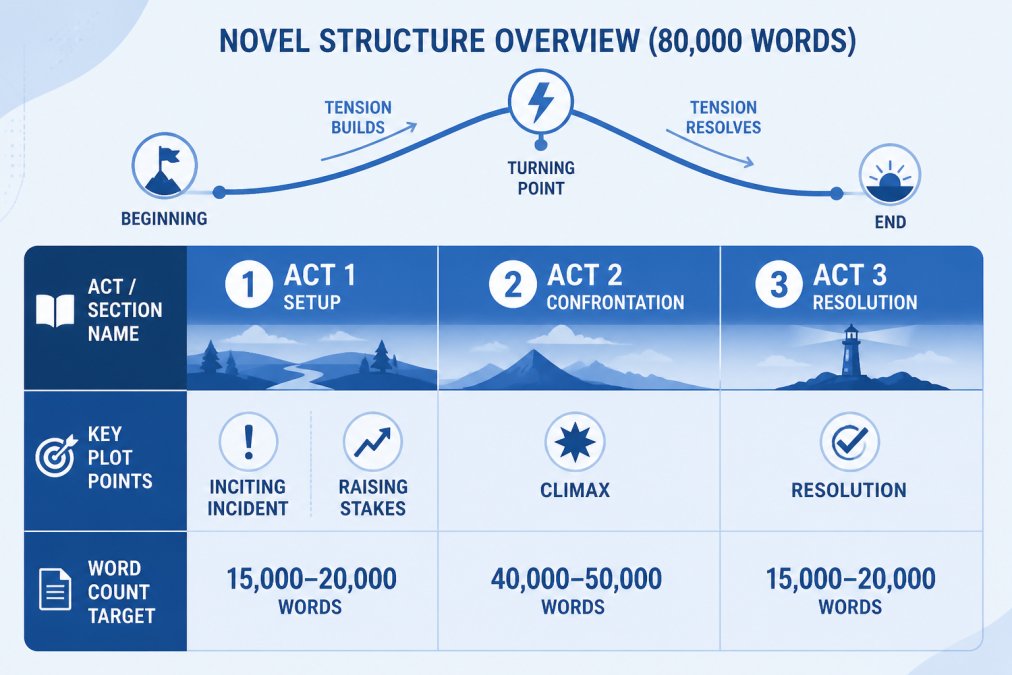
Once the big picture is right, smaller details fall into place more easily. You can see which scenes are necessary and which are redundant. You can spot where you need to add scenes to fill gaps.
Step 6: Create Your Editing Plan and Manage Word Count
Now that you've organized your manuscript and identified structural problems, you need a plan for fixing them.
Building a revision workflow that works with your schedule
Your revision plan should account for how much time you actually have. If you're writing in the margins of a busy life, don't create a plan that assumes 40 hours per week.
Be realistic. If you have two hours a week, that's roughly eight hours per month. At that pace, revising an 80,000-word manuscript takes several months. What matters is consistency.
A practical workflow might look like this:
- Week 1-2: Break manuscript into scenes, create summaries, identify plot holes
- Week 3-4: Fix major structural problems (reorganize scenes, add missing scenes)
- Week 5-8: Revise Act 1 (scene by scene, focusing on clarity and pacing)
- Week 9-12: Revise Act 2 (the longest section)
- Week 13-14: Revise Act 3 (usually shorter)
- Week 15-16: Line editing (sentence-level work, grammar, style)
- Week 17-18: Final proofread
Your actual timeline depends on your manuscript's length, available time, and how much revision is needed.
Handling large word counts and knowing when to cut
First drafts are often bloated. You've written scenes to explore ideas, added subplots that don't go anywhere, or spent too much time on setup. That's normal.
Most manuscripts benefit from cutting 10-15% of the first draft. If your first draft is 100,000 words, your final manuscript might be 85,000-90,000 words.
Where do you cut? Look for:
- Scenes that repeat information you've already established
- Subplots that don't connect to the main story
- Descriptions that are beautiful but don't move the plot forward
- Dialogue that's realistic but not necessary
Use your scene summaries to identify candidates for cutting. If a scene's summary doesn't clearly explain why it matters, it might be expendable.
But don't cut during organization. That comes later, during revision. Right now, your job is to see what you have and understand how it fits together.
Common Mistakes to Avoid When Organizing Your Draft
Trying to revise while organizing. Many writers start organizing and immediately begin rewriting scenes. That's a trap. Organizing and revising are different tasks. Do one, then the other.
Waiting for perfection before organizing. Some writers think they need to finish their first draft before organizing. But organization is part of the drafting process. Break your manuscript into scenes even if you're still writing new material.
Using a system that doesn't match your brain. If you're a visual thinker, a spreadsheet might feel sterile. If you prefer simplicity, specialized software might feel like overkill. Experiment. The best system is the one you'll actually use.
Ignoring small plot problems. A small inconsistency, a character's name spelled two different ways, a detail that contradicts something established earlier, these seem insignificant. But they accumulate and distract readers. Fix them during organization.
Organizing without a clear goal. Know why you're organizing. Are you trying to see if your story works structurally? Are you preparing for revision? The goal shapes how you organize.
Organization is the bridge between drafting and revision. It's where you stop being in the flow of creation and start thinking like an editor. That shift is uncomfortable for many writers, but this is where your manuscript becomes a coherent, purposeful piece of writing.
The writers who finish manuscripts are the ones who take this step seriously. They organize, they plan, they revise with intention. If you're stuck with a messy first draft, start here. Break it into scenes. Create summaries. Map your structure. Then build your revision plan.
If you're working through this process and finding it overwhelming, writeinspire's Writer Coaching and Guided Resources provides structured support to help you organize and revise your manuscript. The coaching focuses on practical steps, breaking your draft into manageable pieces, identifying what's working, and building a clear path forward. With over 30 years of experience in manuscript development, writeinspire understands the specific challenges writers face when organizing a messy first draft, and they can help you move from chaos to clarity.
Frequently Asked Questions
How do I structure a rough draft that lacks a clear plot?
Start by identifying every scene you've written, then arrange them chronologically or by narrative importance. Write a one-sentence summary for each scene describing what happens and why it matters. Once you see the full sequence, gaps in your plot become obvious. Use a visual map, index cards, spreadsheet, or manuscript software, to experiment with different scene orders. This reveals which plot points need adding and which scenes don't serve your story. Many writers find that organizing first, then revising, makes the plot structure emerge naturally.
What's the best way to track character arcs in a messy draft?
Create a separate document for each major character listing their key scenes in order. Note what they want, what they fear, and how they change in each scene. This shows whether their arc feels complete or if scenes are missing. Many writers discover their protagonist appears too rarely or a supporting character's journey disappears halfway through. Visual mapping techniques like storyboarding each character's moments helps you see the full arc at once. Software designed for novel organization often includes character-tracking features that make this easier.
How do I identify plot holes in an unstructured novel?
Once you've organized your manuscript into scenes and chapters, read through your scene summaries without the full text. This high-level view reveals missing information, unexplained character decisions, and timeline inconsistencies. Ask yourself: Does this character's motivation make sense? Are all promises made to the reader fulfilled? Did something happen off-page that should happen on-page? Create a checklist of plot elements introduced early and verify each one is resolved. Writing coaching can help you spot blind spots in your own work that you might miss alone.
Can I organize a manuscript that's been sitting unfinished for years?
Yes. Start by reading through your entire draft without editing, making notes on what's there and what feels incomplete. Break it into scenes and chapters as they exist now, then assess: Which parts are strong? Where does momentum drop? What subplot got abandoned? You may discover the draft is closer to finished than you think, or that it needs significant restructuring. Many writers find that stepping away and returning with fresh eyes makes organization clearer. If you're uncertain about the path forward, writing consultation can help you identify what's salvageable and what needs reworking.
Organizing a messy manuscript draft feels daunting until you break it into steps. The process, scenes, summaries, structure, revision plan, transforms a confusing pile of words into a clear roadmap. You'll see your story's true shape, spot problems before they become expensive to fix, and move into revision with confidence instead of dread. Start with scenes. That single step changes everything.
This article was written using GrandRanker